
This Excel tutorial explains how to add Excel Add-in in Ribbon.
You may also want to read:
Writing your first Excel Macro by recording Macro
Why use Excel Add-in
After you have created a Macro (Sub Procedure), you may want to distribute it for users to use. You can simply add the VBA code in the Module of a Workbook and then distribute the Workbook, but the problem is that the Macro cannot be used in other Workbook.
Depending on the situation, you may want to distribute a Macro is through Add-in. Add-in is a file with extension .xla (for Excel 2003 and older version) and .xlam (for Excel 2007 and newer version) where users can use the Macro in any Workbook in his workstation. The Add-in itself is stored in the local drive of the receiver, it is not stored in a Workbook. If you have used Functions from Analysis ToolPak before, you realize that if you send the Workbook that used the Function (such as MRound, Networkdays) to others who do not have the Add-in, the formula will fail once refreshed.
To summarize, if your Macro is only for use in particular Workbook, you don’t have to use Add-in. If not, create an Add-in.
After creating an Excel Add-in, send the Add-in to users, then install the add-in.
In order to facilitate users to locate and run the Macro, I highly recommend to add the Macro in Ribbon.
In the following demonstration, I will use a real example where I create several Macro for users to validate data, such as data formatting and conflicting values.
Create Excel Add-in
Assume that you have already created several Sub Procedure in the Module of a Workbook. You should check carefully that “ThisWorkbook” refers to the Add-in Workbook, not the ActiveWorkbook. Change from “ThisWorkbook” to “ActiveWorkbook” if needed.
The next step is to tell Excel to create a ribbon.
In VBE (Alt+F11), double click on ThisWorkBook under VBA Project of the Add-In, we need to add two Events here:
Workbook.AddinInstall Event – Triggered when users install the Add-in. We are going to tell Excel to add ribbon here.
Workbook.AddinUninstall Event – Triggered when users uninstall the Add-in. We are going to tell Excel to remove ribbon here.
Insert the following code in ThisWorkbook
Private Sub Workbook_AddinInstall()
    With Application.CommandBars("Formatting").Controls.Add
        .Caption = "Identify incorrect Date format"  'The button caption
        .Style = msoButtonCaption
        .OnAction = "checkDateText"  'The Macro name you want to trigger
    End With
End Sub

Private Sub Workbook_AddinUninstall()
    On Error Resume Next
        Application.CommandBars("Formatting").Controls("Identify incorrect Date format").Delete
    On Error GoTo 0
End Sub
The above code adds a button called Identify incorrect Date format. If you want to add more, copy the code and change the Caption and OnAction parameters.
Save Excel Add-In
Save the Workbook as you would normally save it, except that you save it as xlam file type for Add-In. Name the file as checking P2 template.
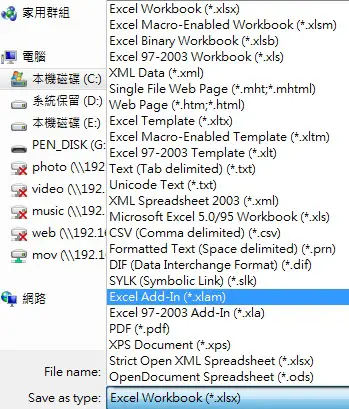
The xlam file icon looks like Excel, you can send this file for users to install.

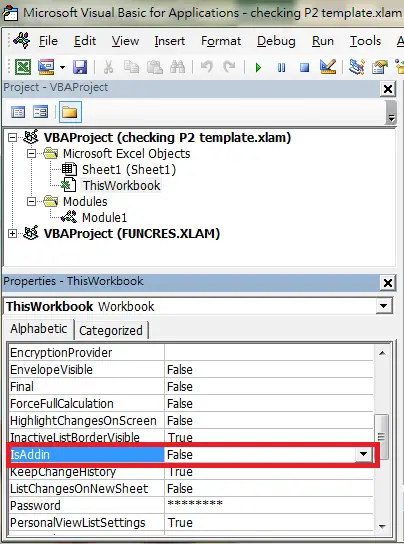
After you have saved the file as .xlam, all worksheets are hidden.
To change it back to a normal worksheet, change the IsAddin Property of ThisWorkbook to False.
Install Excel Add-in (User)
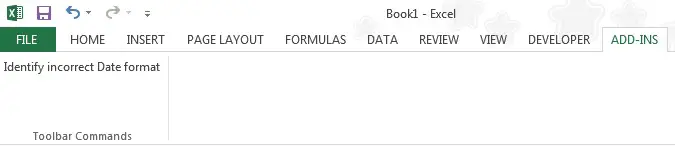
Navigate to Developer tab > Add-Ins, browse the Add-In location to add.

Now a tab called ADD-INS is added, under which is the button “Identify incorrect Date format”
If you have many items, you can group items by different CommandBars as below.

In the above example, I grouped them by Formatting / Worksheet Menu Bar
    With Application.CommandBars("Formatting").Controls.Add
        .Caption = "Remove Space in prefix/suffix"
        .Style = msoButtonCaption
        .OnAction = "checkSpace"
    End With

    With Application.CommandBars("Worksheet Menu Bar").Controls.Add
        .Caption = "Identify incorrect Original Hire Date"
        .Style = msoButtonCaption
        .OnAction = "chk_Original_Hire_Dt"
    End With
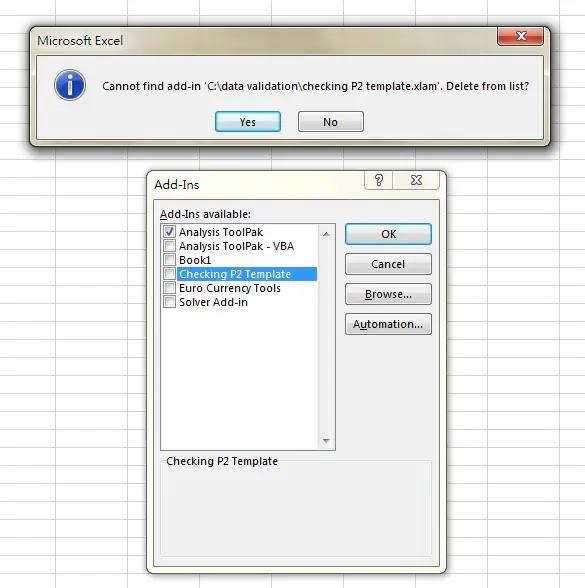
Remove Excel Add-in
When you uncheck (uninstall) the box “Check P2 Template”, the option is still there.
If you want to completely remove the option from the Add-Ins box
1) Uncheck the Add-in
2) Close the workbook
3) Delete / Move the Add-Ins in your local drive
4) Open Excel, check the option of removed Add-in, then click on Yes to delete
http://sitestory.dk/excel_vba/my_menu.htm
