What is Macro and what is Excel Record Macro function?
Macro is a set of actions that is intended to be repeating all over again. Macro is not a word just for Excel, you can find many other software help users record a set of actions for Windows or even for specific games. The first Macro I used was EZ Macro about 15 years ago, which helps me repeat a set of actions in an online game endlessly in order to get my skill points up. Today I still use keyboard and mouse that can record Macro.
Excel is very kind to have a built-in Record Macro function, which allows you to record actions and turn them into Excel VBA code. You can quickly learn VBA by studying how the code is written for each action, but not everything can be recorded. For example, if you want to type 1 in A1, 2 in A2, 3 in A3, etc until A1000, you still need the programming knowledge to do the loop automatically, instead of recording the action manually.
Finding the Excel Record Macro button
Excel 2003
Navigate to Tools > Macro > Record New Macro
Excel 2007
Right click anywhere on the menu bar > Customize Quick Access Tool Bar > Popular > check the “Show Developer Tab in Ribbon” box
Click on the Developer tab, you will find “Record Macro” button
Excel 2010, 2013
Right click anywhere on the menu bar > Customize the Ribbon > check “Developer” box
Click on the Developer tab, you will find “Record Macro” button
For Excel 2007 and onwards
You will also find another button called “Use Relative References” below “Record Macro” button.
If this option is off, all Range address are hard coded, such as Range(“A1”), but I can’t say it is “absolute” because it has no $ sign. If this option is on, all Range address are relative using OFFSET Method in VBA.
To understand what is OFFSET Property, click to read the below article
Excel VBA OFFSET Property for Range
Record Macro
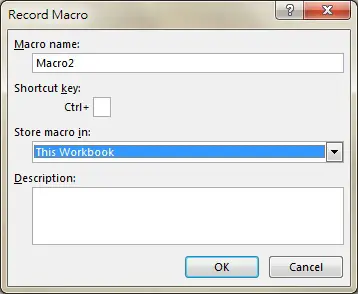
After clicking on the “Record Macro” button, you will see the following box.
| Macro Name | A name which should not have space, should not be a name already defined by you anywhere in this workbook or a reserved keyword |
| Shortcut key | You can execute the Macro using Shortcut key |
| Store Macro in | You are recommended to leave it default as “This Workbook”, unless you want to save the Macro in a separate Project or Workbook |
| Description | This description will be coped to theVB code as comments |
Click on OK button to start Recording, click on the stop button to stop recording.
Run recorded Macro
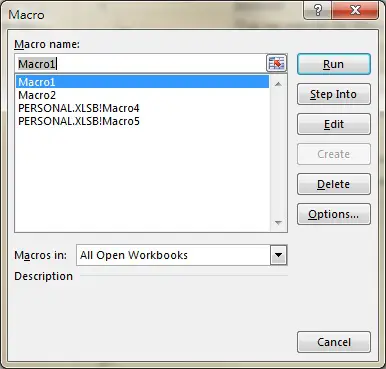
Under Developer tab, click on “Macro” button
You will find a list of Macro you have created, click on “Run” button to run the Macro.
| Run | Run the Macro immediately |
| Step Into | Open Visual Basic Editor and jump to the VBA code of Macro where you can edit the code. Each time you press F8, one line of code will execute for debugging purpose. |
| Edit | Open Visual Basic Editor and jump to the VBA code of Macro where you can edit the code. You can still press F8 to run each line of code, but “Step Into” button saves you the first click of F8, which set focus to the first line of Macro. |
| Delete | Delete Macro |
| Options | Modify description of Macro (where you can find it in VBA code) or change the Short Cut key |
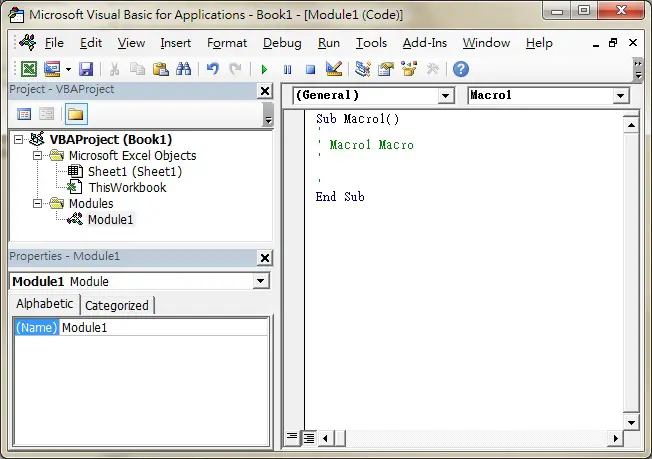
You can also press Alt+F11 directly to enter into Visual Basic Editor, double click on the “Modules” folder on the left, then double click the Module under it. You will find all your Macro. You can click on the green triangle on the tool bar to run the Macro directly.
If you cannot find the Section “Project – VBAProject”, click on “View” on the menu bar, then select “Project Explorer”.
Save the workbook containing Macro
For Excel 2003, you can save the workbook as XLS
For Excel 2007 and later, you have to save the workbook as XLSM (Macro enabled-workbook), otherwise you will lose all the Macro as you reopen the workbook.
Outbound References
https://www.youtube.com/watch?v=Q_HQGHPBYoo
https://www.youtube.com/watch?v=KKJj78LoFaA


