How to Change Default Excel Date Format (such as MMDD to DDMM)

This Excel tutorial explains how to change default Excel Date Format from Change Date and Time Format in Control Panel.

How to Change Default Excel Date Format

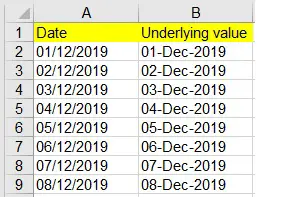
In the country I live, we normally use date format dd/mm/yyyy. However whenever I work for the US company, the system defaults to mm/dd/yyyy. This is annoying and it causes Excel error. For example, if I mistakenly type UK format 31/12/2019, the date will be recognized as a text because there is no such month as 31. It is even risky if you don’t see this error as you are not aware that you have mistakenly input a wrong date. Although you can simply use Text Function to change the date format, it is just a one time solution and it does not address the issue every time you create a new Workbook.

This tutorial will explain how to change default Excel date format from Windows setting. The change does not just apply to Excel but all the related Windows environment. Note that if you are not a Windows administrator, you may not be able to make this change.

Example – Change Default Excel Date Format in Control Panel

Suppose we want to change default Excel date format from dd/mm/yyyy to mm/dd/yyyy.


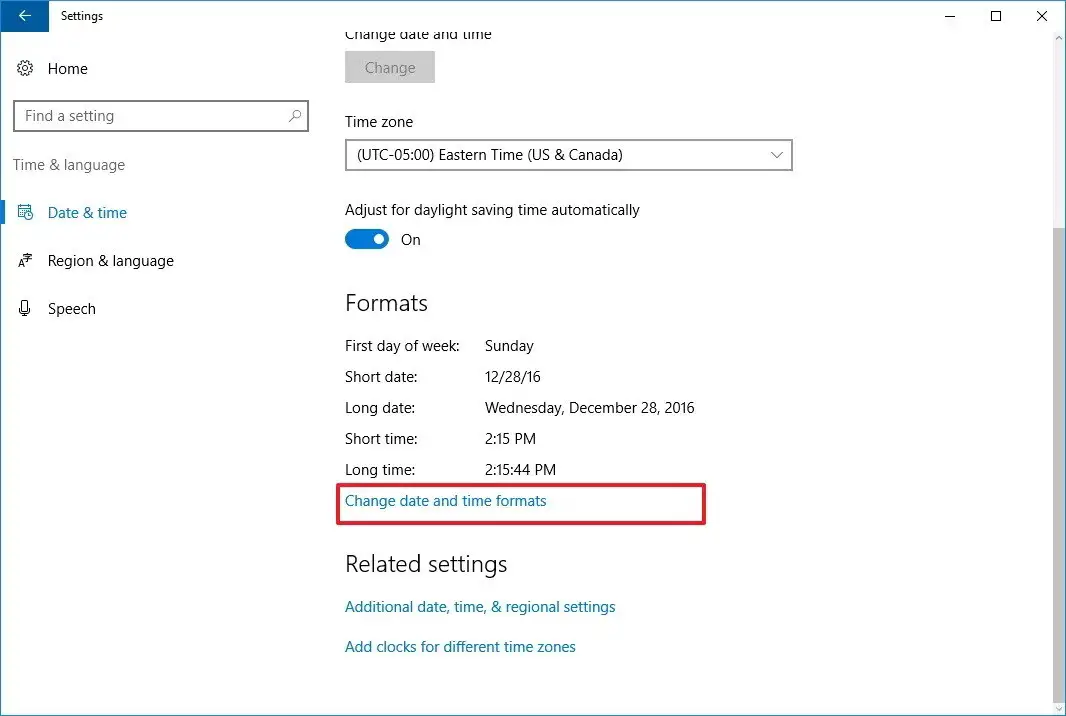
In Windows 10, navigate to Control Panel > Date and Time > Change Date and Time Format

Even if you are using older versions of Windows, the navigation maybe a little bit different, you can still find this option.


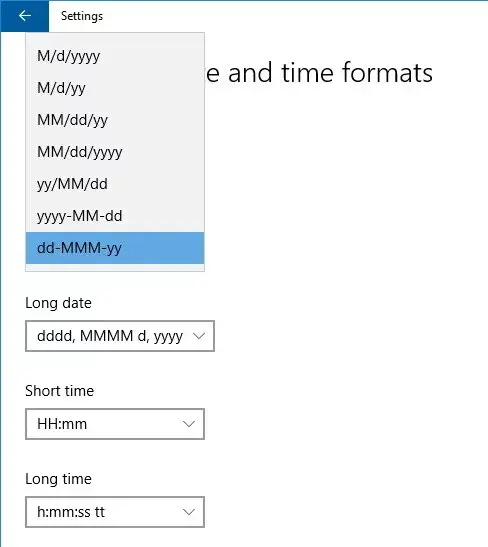
The Short Date format is currently displaying dd/MM/YYYY, now change to MM/dd/yyyy.


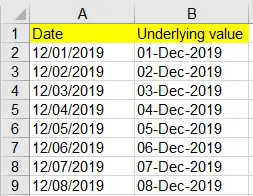
Go back to Excel spreadsheet, the value in column A automatically changed.

This makes complete sense because if the date format doesn’t change, all your existing workbooks will be messed up.

Outbound References

https://support.office.com/en-gb/article/text-function-20d5ac4d-7b94-49fd-bb38-93d29371225c

Excel VBA convert date period to date row

This Excel VBA tutorial explains how to convert date period to date row.

Excel VBA convert date period into date row

Different systems store date transactions differently. For example, if you apply for annual leave from Jan 1 to Jan 3, some system store the data in data base using date period

Begin DateEnd Date
1/1/20181/3/2018

However some system store one date per row.

Begin DateEnd Date
1/1/20181/1/2018
2/1/20182/1/2018
3/1/20181/3/2018

To convert from one format to another is extremely difficult and time consuming. In this tutorial, I will demonstrate how to convert date period to date row, because I personally think this data structure is easier to handle.

VBA code – convert date period to date row

Press ALT+F11, insert the code into a Module.

Public Sub convertDate()
  beginDtCol = "B"  'column that contains begin date period
  endDtCol = "C"   'column that contains end date period
  For r = Range(beginDtCol & Rows.Count).End(xlUp).Row To 2 Step -1
    If Range(endDtCol & r) - Range(beginDtCol & r) > 0 Then
      For i = 1 To Range(endDtCol & r) - Range(beginDtCol & r)
        Rows(r).EntireRow.Copy
        Range("A" & Range(beginDtCol & Rows.Count).End(xlUp).Row + 1).Select
        ActiveSheet.Paste
 
        Range(beginDtCol & Range(beginDtCol & Rows.Count).End(xlUp).Row) = Range(beginDtCol & r) + i
        Range(endDtCol & Range(endDtCol & Rows.Count).End(xlUp).Row) = Range(beginDtCol & r) + i
      Next i
      Range(endDtCol & r) = Range(beginDtCol & r)
    End If
  Next
  Range("A1").AutoFilter
  'sort column A
  ActiveSheet.AutoFilter.Sort.SortFields.Add Key:=Range("A:A"), SortOn:=xlSortOnValues, Order:=xlAscending, DataOption:=xlSortNormal
  ActiveSheet.AutoFilter.Sort.Apply
End Su


Example – convert date period to date row

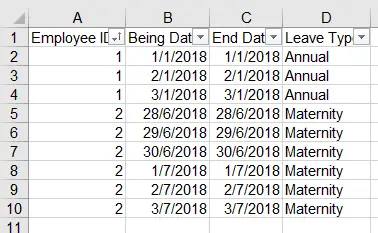
Suppose we have two leave transactions below.


Run the Macro, date period is converted to date row. In addition, all the other column values are copied.

Column A is also sorted in ascending order. Change the code at the bottom if you want to sort another column.


Excel compare time or apply condition on timestamps

This Excel tutorial explains how to compare time or apply condition on timestamps in Excel spreadsheet

Excel compare time or apply condition on timestamps

When we have two timestamps (a date with time) on the same date, we can use simple subtraction on the two timestamps to compare.

If the two timestamps have different dates, we can still minus the timestamps to compare.

But if we only want to compare the time only without considering the date, we need to extract the time portion of timestamps to compare another time. I will demonstrate how to do this in the below example.

Example – compare time

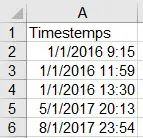
Let’s say we have the following timestamps, our goal is to determine whether the time is morning, afternoon, or night. Therefore the comparison is not date specific, we have to standardize the time in order to do comparison.

Step 1 – Define morning / afternoon / night

To define morning, the condition is time >=0:00 to <12:00  (0am-12pm)

For afternoon, the condition is time >=12:00 to <18:00   (12pm-6pm)

For night, the condition is time >=18:00 to <24:00   (6pm-12am)

Next, convert the time to numerical value, by dividing the time (in hour) by 24 hours. The reason is that the underlying value of time is a numerical value, value 1 means 24:00 on date 0/1/1900. Click here to see my previous post to learn more.

Therefore, the condition in Excel formula should be expressed as

Morning condition: AND(time>=0, time<0.5)

Afternoon condition: AND(time>=0.5, time<0.75)

Night condition: AND(time>=0.75, time<1)

Step 2 – Convert timestamps to date 0/1/1900

The second step is to standardize the Timestamps to date 0 of year 1900 using Mod Function. Click here to see the reason why using MOD Function.

Step 3 – Combine the condition

Finally apply the condition on the result of MOD. In fact, you can do everything in one formula, but the formula would be very long.


Excel calculate year of service with different methods

This Excel tutorial explains how to calculate year of service in Excel using different calculation methods.

Excel calculate year of service

Having worked for human resources field for some years in different companies, I have seen different systems / companies use different calculation methods to calculate year of service for annual leave entitlement. In this post, I want to summarize how to use Excel to calculate year of service using different methods to help HR professionals.

Method 1 – calculate year of service in decimal places

Different legislation have different calculation method for year of service in decimal places, so it is necessary to tailor make a formula for specific needs, there is really no single solution.

But generally speaking, Excel has a Function called 360, which can serve the purpose with the assumption that each month has 30 days.

For example, an employee joined in Jan 1st of 2015, up till Jun 2nd 2017, year of service is

=DAYS360(DATE(2015,1,1),DATE(2017,6,2))/360     return 2.4194

Method 2 – Complete year of service as of January 1st

For payroll purpose, company would calculate employee’s year in decimal places. But for other benefits purpose, HR does not need to know the decimal places because most benefits are associated with complete year of service, but there are different definitions of completing year of service. One way is to calculate complete year of service as of January 1st of each year.

For example, an employee joined on Mar 1st, 2016.

As of Jan 1st 2017, employee has 0 completed year of service.

As of Jan 1st 2018, employee has 1 completed year of service.

To calculate this in Excel formula, use DATEDIF Function.

For example, as of Jan 1st 2018

=DATEDIF(DATE(2016,3,1),DATE(2018,1,1),"Y")      return 1

This calculation method underestimates employees’ years of service compared with the actual year of service.

Method 3 – Complete year of service as of Dec 31st

For most companies, annual leave entitlement is given beforehand on Jan 1st of each year. For example, when an employee is joined on Mar 1st 2016, annual leave is given on the first date of hire on pro-rata baisis, and then given on Jan 1st 2017, instead of giving on Mar 1st 2017.

For this type of year of service calculation, we can use DATEDIF function but unlike method 2, we use Dec 31st as the end date parameter.

For example, year of service as of 2018 is

=DATEDIF(DATE(2016,3,1),DATE(2018,12,31),"Y")      return 2

This calculation method overestimates employees’ years of service compared with the actual year of service.

Method 4 – Year of service in decimal places as of month end

A more accurate method to calculate year of service is to recalculate every month end. This calculation method is also being used in annual leave entitlement calculation to avoid too much underestimation and overestimation.

For example, when an employee is joined on Mar 2nd, 2016

as of Apr 30st, 2018, completed year of service is 2 year + 1 month / 12

To express this in Excel formula, this time we make use of “YM” parameter in DATEDIF Function

=DATEDIF(DATE(2016,3,2),DATE(2018,4,30),"Y")+DATEDIF(DATE(2016,3,2),DATE(2018,4,30),"YM")/12      return 2.8333

This formula works perfectly the start month is larger than the end month

=DATEDIF(DATE(2016,4,2),DATE(2018,3,30),"Y")+DATEDIF(DATE(2016,4,2),DATE(2018,3,30),"YM")/12      return 1.917


Excel Days360 Function to calculate day difference

This Excel tutorial explains how to use Excel Days360 function to calculate day difference between two dates.

Excel Days360 Function

You can easily calculate the number of days between two dates by a simple deduction using Excel formula, however when you try to calculate the number of years between two dates, most people simply divide the day difference by 365. However, because every month has different days, and due to leap year, dividing the difference by 365 is totally incorrect.

Excel Days360 Function calculates the day difference, with the assumption that each month has 30 days. This assumption is made because some accounting systems use this assumption, in fact there are different assumptions for different regulations, but Days360 Function is probably most easy to use, as you need to write VBA custom function for other assumptions. The 30 days assumption is important in order to calculate the year difference between two dates.

You can also consider using DateDif Function to calculate difference between two dates in complete year, month or day.

Syntax of Excel Days360 Function

DAYS360(start_date,end_date,[method])

Start_dateBegin date for calculation. Refer to the use of Date Function if your data is text.
end_dateEnd date for calculation
MethodFalse (default): U.S. (NASD) method. If the starting date is the last day of a month, it becomes equal to the 30th day of the same month. If the ending date is the last day of a month and the starting date is earlier than the 30th day of a month, the ending date becomes equal to the 1st day of the next month; otherwise the ending date becomes equal to the 30th day of the same month.

TRUE: European method. Starting dates and ending dates that occur on the 31st day of a month become equal to the 30th day of the same month.

Example of Excel Days360 Function

FormulaResultExplanation
=DAYS360(DATE(2015,1,1),DATE(2016,1,1))360Difference between two dates is 360 days. Note that the start date is not inclusive
=DAYS360(DATE(2015,2,1),DATE(2015,3,1))30Difference between two dates is 30 days
=DAYS360(DATE(2015,2,1),DATE(2015,2,1))0Difference between two dates is 0 day
=DAYS360(DATE(2015,1,1),DATE(2017,6,2))/3602.4194Year difference between two dates
=DAYS360(DATE(2015,1,1),DATE(2017,6,2))/3029.033Month difference between two dates

To calculate the complete year and then the remaining month and day, use MOD function and INT function to help

FormulaResultExplanation
=INT(DAYS360(DATE(2015,1,1),DATE(2017,6,2))/360)2Complete year difference between two dates
=INT(MOD(DAYS360(DATE(2015,1,1),DATE(2017,6,2))/30,12))5Remaining month difference

The remaining day difference is total day difference – year difference * 360 – month difference * 30

= DAYS360(DATE(2015,1,1),DATE(2017,6,2)) - 2*360 - 5*30
= 871 - 720 - 150
= 1

Therefore, the difference between 2015 Jan 1st to 2017 Jun 2nd is 2 years 5 months and 1 day, start date not inclusive.

Outbound References

https://support.office.com/en-us/article/DAYS360-function-B9A509FD-49EF-407E-94DF-0CBDA5718C2A


Excel first date of month and last date of month

This Excel tutorial explains how to find first date of month, last date of month using Excel worksheet Function and Excel VBA Function.

You may also want to read:

Excel Use Date in IF Condition

Excel first date of month

To find first date of month in Excel, first we have to understand DATE Function, you can use it to combine the year, month and day to a date.

Syntax of Date Function

DATE( year, month, day )

Example

FormulaResultExplanation
=Date(2012,1,1)1/1/2012Combine all three arguments to date 2012 Jan 1st
=DATE(YEAR(TODAY()),MONTH(TODAY()),DAY(TODAY()))13/3/2016Year Function returns  year of the date, Month function returns month of a date, Day function returns day of a date.

Assume today is March 13th, use today’s year, month, day as the arguments to return today’s date

To get the first date of specific month, say this month, use today’s month and year, and then use 1 for day argument

=DATE(YEAR(TODAY()),MONTH(TODAY()),1)

Excel last date of month

There are several ways to find the last date of month, I am introducing two ways that I like most.

Unlike first date of month, we cannot directly input “31” in the day argument because every month has different number of days. Instead we can find the first day of next month and then minus 1 day. Excel is very clever that when you add 1 month to December, the year also adds 1, so this trick also works for year end. The formula below returns the last date of current month.

=Date(Year(Today()),Month(Today())+1,1)-1

We can also simply this formula using 0 in the day argument instead of using -1. 0 returns the last date of previous month.

=Date(Year(Today()),Month(Today())+1,0)

Excel VBA first date and last date of month

In VBA, the relevant Function name is different but the logic and arguments are the same.

Excel Worksheet FunctionVBA Function
DateDateSerial
Today()Date()
YearYear
MonthMonth
DayDay

Example

FormulaResultExplanation
Dateserial(2012,1,1)1/1/2012Combine all three arguments to date 2012 Jan 1st
DateSerial(Year(Date), Month(Date), Day(Date))13/3/2016Assume today is March 13th, use today’s year, month, day as the arguments to return today’s date.
DateSerial(Year(Date), Month(Date), 1)1/3/2016First date of current month
DateSerial(Year(Date), Month(Date)+1, 0)31/3/2016Last date of current month


Outbound References

https://support.office.microsoft.com/en-gb/article/DATE-function-9b619152-52d4-48f0-b1ab-a32dee59b6e4?CorrelationId=2fb5edef-b55a-4aa8-b5c3-deb71eb98471&ui=en-US&rs=en-GB&ad=GB

Access Excel VBA day month year difference between two dates

This Access Excel tutorial explains how to find complete year difference, month difference and date difference between two dates.

You may also want to read:

Excel DATEDIF Function to calculate date difference

Access Excel VBA difference between two dates (year difference, month difference, day difference)

In Excel worksheet, there is a Function called DateDif that can calculate difference between two dates in complete year, month or day.

In VBA, there is no DateDif Function. There is a similar Function, DateDiff, which is used to calculate date difference but it does not consider the whole date in the calculation. For example, if you want to find the year difference, the Function extracts only the year to calculate difference between two years, ignoring month and day.

Fortunately, you can still access DateDif in Excel VBA through Application.Worksheetfunction Property

Application.Worksheetfunction.DateDif(st_date, ed_date)

The purpose for this topic is that:

1) Recreate DateDif Function for Access, Access VBA, Excel VBA

2) Count the end date in the calculation of difference

VBA Code –  difference between two dates

Public Function wDateDif(stDt, edDt, interval)
    tempdt = stDt
    
    Select Case interval
    Case "Y"
        Do While edDt >= DateAdd("yyyy", 1, tempdt) - 1
            tempdt = DateAdd("yyyy", 1, tempdt)
            counter = counter + 1
        Loop    
    Case "M"
        Do While edDt >= DateAdd("m", 1, tempdt) - 1
            tempdt = DateAdd("m", 1, tempdt)
            counter = counter + 1
        Loop
    Case "D"
        counter = edDt - stDt + 1
    End Select
    
    wDateDif = counter
End Function

Syntax –  difference between two dates

wDateDif(stDt, edDt, interval)
stDtBegin date
edDtEnd Date
interval“Y” – complete year difference
“M” – complete month difference
“D” – complete year difference

Example-  difference between two dates

difference_dates

Formula of C2: =wdatedif(A2,B2,”Y”)

Formula of D2: =wdatedif(A2,B2,”M”)

Formula of E2: =wdatedif(A2,B2,”D”)

Outbound References

https://www.techonthenet.com/excel/formulas/datedif.php


Excel convert column with Date and Text to Date

This Excel tutorial explains how to convert a column with Date and Text to Date.

Excel convert column with Date and Text to Date

Excel has a built-in Function DateValue, which converts a Date in Text format to date serial. What if the column contains both Text and Date? If you use DateValue Function on Date, #VALUE! will return. So how can we convert Text and Date at the same time?

Convert Text to Date in Notepad

The below method is even faster than DateValue Function or Text to Column, it is applicable to a column with pure Text or a column mixed with Text and Date.

1) First of all, copy the column Range that contain Text. In the below example, copy Range A1:A2

text_to_date

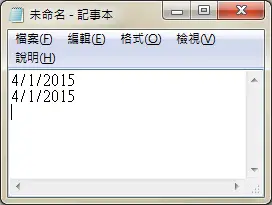
2) Paste the copied Range to Notepad

text_to_date_02

You can see Notepad disregards the underlying format in Excel, it will paste whatever it looks. Therefore you should note carefully the month and date format.

3) Finally copy and paste back to Excel.

Whether the value pasted to Excel is mm/dd or dd/mm depends on the Local Time setting in Control Panel.


Excel Display Time from Date Time

This Excel tutorial explains how to use Custom Format to display Time from Date Time.

You may also want to read:

Excel Extract Time from Date Time

Excel Custom Format

Excel Display Time from Date Time

In my previous post, I have explained how to extract time from date time. What I mean “extract” is that the date is using formula to  completely remove date from date time. In this tutorial, I will explain how to use custom format to display Date Time in Time format.

Custom Format to display Time

To change how Date Time is displayed, right click on the Cell containing the Date Time > Format Cells > Custom

text2

Below are some Custom Formats for time.

hhExpress hour from 01 to 24. If hour exceeds 24, a day will add and hour will be subtracted by 24
mmExpress month in number, from 01 to 12
ssExpress second from 01 to 59. If second exceeds 60, a minute will add and second will be subtracted by 60
[hh]Convert date and time to hours, allow you to display hour larager than 24
[mm]Convert date and time to minute, allow you to display minute larger than 60
[ss]Convert date and time to second allow you to display second larger than 60

Display in hh:mm format and ignore Date value

If you want to completely ignore the Date from Date Time, format the Cell as hh:mm

For example,  1/1/2014  1:01:01 is displayed as 01:01

Display in hh:mm format and accumulate Date value as hour

– If you want to display hh:mm but you want to convert Date (24 hour for 1 day) to hh, use [hh]:mm

For example, 1/1/2014  1:01:01 is displayed as 999361:01

99361 is the number of hours past since 1/1/1900 00:00:00

Similarly, you can use [mm] to convert Date+Hour to minute, use [ss] to add Date+Hour+Minute to second.

Convert to hh:mm Text format

If you want to use formula to do conversion instead of simply changing the display, you can use the Text formula. For example,

=TEXT(A1,”[hh]:mm”)

Convert to hh:mm Value format

=A1 – INT(A1)

or

=MOD(A1,1)

Outbound References

https://support.office.com/en-us/article/Create-a-custom-number-format-78f2a361-936b-4c03-8772-09fab54be7f4?CorrelationId=f9dfc98c-1186-44d5-b23c-5843840ad1ec&ui=en-US&rs=en-US&ad=US


Excel VBA Application.OnTime Method to schedule event with timer

This tutorial explains how to use Excel Application.OnTime Method to trigger / schedule event at specified time.

You may also want to read:

Auto Open Excel with Windows Task Scheduler

Excel automatically refresh pivot table

Excel VBA Application.OnTime Method to trigger event at specified time

You can do the followings with Excel VBA Application.OnTime Method

– schedule a procedure to be run at a specified time in the future

– schedule a procedure to be run after a specific amount of time

– run a procedure repeatedly at specific time interval

Application.OnTime Method only works when Excel is opened, therefore it is best to work with Windows Task Scheduler, which can open Excel at specific time. You can write a Macro to auto execute Application.OnTime when Excel is opened.

Syntax of Application.OnTime Method

Application.OnTime(EarliestTime, Procedure, LatestTime, Schedule)
NameRequired/OptionalData TypeDescription
EarliestTimeRequiredVariantThe time when you want this procedure to be run.
ProcedureRequiredStringThe name of the procedure to be run.
LatestTimeOptionalVariantIf a Procedure is running and prevent another scheduled Procedure to run, Excel waits until the previous Procedure is complete. You can set the maximum waiting time when the scheduled Procedure do not run.
ScheduleOptionalVariantTrue to schedule a new OnTime procedure. False to cancel a previously set procedure. The default value is True.

Example of Application.OnTime Method

Assume that you have written a Procedure called my_Procedure.

The following  code run my_Procedure after 10 seconds.

Application.OnTime Now + TimeValue("00:00:10"), "my_Procedure"

The following  code run my_Procedure at 1PM.

Application.OnTime TimeValue("13:00:00"), "my_Procedure"

Run a Procedure repeatedly

The above examples demonstrate how to run a Procedure once, but to run a Procedure infinitely, we need to loop the Application.OnTime Method in my_Procedure.

First create a my_Procedure to show the current time in A1.

Sub my_Procedure()
   Range("A1") = Format(Now(), "yyyy mmm d, hh:mm:ss")
End Sub

Then create another Procedure called my_onTime, this Procedure run my_Procedure every second.

Sub my_onTime()
    Application.OnTime Now + TimeValue("00:00:1"), "my_Procedure"
End Sub

Finally insert my_onTime in my_Procedure, so that two Procedures call each other

Sub my_Procedure()
    Range("A1") = Format(Now(), "yyyy mmm d, hh:mm:ss")
    my_onTime
End Sub

Now you have created a clock in Range A1, which updates current time every second, press Ctrl+Break to stop both Procedure.

Outbound References

https://msdn.microsoft.com/en-us/library/office/ff196165.aspx